 As she disappeared under the boat I cranked in my line, bringing the free-swimming, quick-set rigged livebait halfway up off bottom and closer to the boat. I activated the spinner attractor, twitched and pulled the bait a couple of times to set it off-balance and struggling to right itself and return to the safety of the bottom. Heads snapped as the reel screamed zzzzzzzzttttttt! When she grabbed it and headed for deep water. As she disappeared under the boat I cranked in my line, bringing the free-swimming, quick-set rigged livebait halfway up off bottom and closer to the boat. I activated the spinner attractor, twitched and pulled the bait a couple of times to set it off-balance and struggling to right itself and return to the safety of the bottom. Heads snapped as the reel screamed zzzzzzzzttttttt! When she grabbed it and headed for deep water.
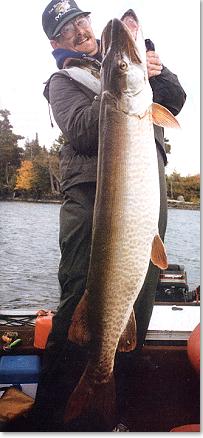
She was moving fast and rapidly putting distance between us, but we were in luck and she was heading off at the perfect angle as I handed the rod over. After a perfectly executed hookset, a toe-to-toe, heavy tackle guerrilla fight, 45-pounds-plus of teeth and muscle was landed and a single No. 3/0 treble hook deftly removed from the corner of her mouth. A couple of quick pictures and she swam away like she had just taken a walk in the park.
Man, it’s beautiful when things go like they’re supposed to! This scenario has been repeated countless times before and since, and this could happen to you, too!
In this article I am not going to spend time on the rigging – it’s been discussed here since the rubberband Herbie Rig came out. More importantly, we’ll discuss the ways to increase your odds of putting baits in front of fish, fish seeing your baits, converting pick-ups into solid hook-ups, and helping to eliminate the small errors in tackle and technique that can cost you fish. If you’ve always though livebaiting was just dragging a sucker around behind the boat under a cork, well, perhaps when we’re done you’ll have a different opinion.
TACKLE, RIGS, AND ACCESSORIES
I will exclusively refer to quick-set rigs and primarily the Herbie Rigs I designed, mainly because they work and allow 100 percent release. These rigs have become a mainstay because they break cleanly from the bait (even though the fish still has the sucker firmly gripped) and allow total freedom of movement with minimal physical damage to the bait. First off, there are some common mistakes made with this rig:
Your connection to the bait is the rubberband and it is a critical component. Too large of a band, or a band with too much elasticity, will not break cleanly or consistently. I prefer dental bands that are designed for braces because they are strong enough to withstand the strength of a robust bait and allow for occasional working of a bait free from snags, yet break cleanly and crisply with a hard, sharp hookset. Make sure the band is twisted tight.
If you are on waters where your likely encounters will be with fish averaging less than 40 inches and are using baits measuring 12 to 14 inches, and are having trouble with not being able to break the bands consistently, try clipping halfway through the bands. Many times these lighter fish just don’t have the weight needed to keep them from turning toward you during the hookset.
The next important connection is the wire lead from the hook to the snap. The lead can only be too short – if so, it restricts the movement of the bait (which is one important aspect that separates this rig from conventional quicksets). Leave slack in the lead so the bait has total freedom of movement, and when the band breaks there will be a slingshot effect which helps pop the hook free.
The placement of the hook is very important – place the hook at least two thirds of the way down the bait from its back and even with the first two spines of the dorsal fin. The most common mistake is placing the hook too high on the bait, since the sucker will be held crossways in a musky’s mouth with the back toward her lips 99.9 percent of the time.
Use a strong 2/0 or 3/0 hook (depending on the size of the bait), file it razor sharp, and bend the hooks out a bit to grab better. Most of the time I prefer one treble. Why? One hook, placed perfectly will look more natural and ultimately get me more hits, and will snag and fatigue the bait less. If a fish grabs the bait by the head or tail it’s usually a small fish anyway. Big muskies tend to grab baits right where they’re supposed to and their yap is big enough to find the hook.
If you get into a pattern in which the fish are acting squirrelly and are grabbing the bait weird you can always make adjustments and go to multiple hooks, but I think you’ll have more hits resulting in more fish if you don’t. Remember, you are trying to fool a fish with the real thing, otherwise you’d be catching them on artificials. And, the colder the water the more sensitive they become – they take their time, look over, and worry about the baits. I even dull my rights with a mottled brown and black paint job so they blend into the baits better.
When it comes to livebait rods, graphite is out, glass is in. Don’t rust even the best of graphite rods, especially in cold weather, because sooner probably than later you will be holding the butt with the blank sliding down your lien and a big fish at the other end and a “What do I do now?’ look on your face. Some use solid saltwater trolling rods but I find them more suitable for a street fight. Saltwater rods are much too heavy for all-day-in-the-hand use and aren’t sensitive enough to telegraph what’s going on with the sucker. There are a few commercial rods that will suffice; however, I have found a custom rod built for me by Thorne Bros. To have the perfect combination of relatively light weight and superior strength with the right taper to “put the hurt on ’em”, yet still provide me with the sensitivity needed to “read” the baits, the structure, and the fish once they’ve taken the bait.
All things considered, 7000 series Garcia Ambassadeurs have what it takes – dependability, excellent drags and clickers, high line capacity for when I go to go to heavy monofilament in cold weather, speed for quickly picking up line in between hooksets, and plenty of cranking power.
Both superlines and mono have their pluses and minuses. Superlines are superior fro breaking the bands cleanly and crisply, but do not have good abrasion resistance around rocks. They will hold some water and freeze up in cold weather, though they’re much better than Dacron. The no-stretch feature will cause you to break more rubberbands when trying to work a sucker out of a snag, too. Mono will not freeze up and has excellent abrasion resistance , but you must hit the fish harder and multiple times to cleanly break the bands. Most snags will bounce out with mono because of its slight spring and the stretch in the bands. Day in and day out I prefer a low-stretch, high abrasion-resistant mono in 40-pound test.
This fall I’m going to experiment with a compromise rig of 100-pound test superline with 20 feet of 40- to 50-pound test mono to the leader. Whatever line you choose always use a leader of at least 40 inches and keep any weights on the wire leader as close to the bait as possible to help eliminate snags and abrasion.
This is not finesse European-style quick-setting by any means. Theory and practicality are two very different things. Very seldom are your baits not around sharp, snaggy rocks, logs, weeds, or other abrasive materials. The hookset is loaded up and full on a heavy object that is stationary or moving away from you, which is totally different from most artificial presentations and strikes in which everything is moving and giving. Through trial and error I’ve found that the heavier the equipment and terminal tackle the better – anything less will result in failed components, broken lines, missed hooksets and lost fish.
COVERING WATER / SPREADING BAITS
Key ingredients to making any presentation more effective and higher percentage is the ability to cover more water, whether it be through speed and/or more area, and making your presentations more visible to fish. Simply dragging a bait below a float behind the boat, free lining a bait behind the boat, or running a weighted line directly below the boat are common methods of presenting baits laterally. I don’t use many floats behind the boat because I don’t have many weeds to work in the fall and most big fish are relating to rocks. When running flat or down lines I prefer to have the rod in my hand (I can only legally run one rod in Canada anyway) so I can work the bait, keep it off balance, and make it struggle. Working the bait close to the boat doubles the hits and cuts the snags at least in half, and with the rod in my hand the bait will often tell me when a musky is around even if it doesn’t take the bait.
Both visual and vibration attractors in the form of spinners on the front of the bait (similar to a big walleye spinner rig) or pinned to the tail (coined “tailgunners”) enable fish to see the baits from greater distances and add a trigger as the bait struggles or becomes nervous when a musky chases it. Attractors seem to work better under windy, cloudy conditions in water temperatures ranging from 45 to 60 degrees. Under calm, sunny conditions, especially in clear water, and when the water temps drop below 45 degrees, “clean” baits are usually more productive.
By employing planer boards into my livebait presentation years ago, a whole new dimension was opened that allowed fishing areas that I couldn’t effectively get to with livebaits before (Illustration 1). Steep shorelines, rock walls, the tops and breaks of rock bars, and the other side of the boat (for either suspended fish or deeper breakline fish) are favorite targets to work. They also work great in clear water or when some fish are shallow or up tight to structure. I’ve even seen many times where the planer acted as an attractor with big muskies following them before dropping back to take the bait.
A second (“inside” planer board line can be run (if legal in your area) between the outside board and the boat to intercept fish that followed and are returning to structure, or to catch fish holding at the depth the line is running.
A general rule I’ve used is to run out twice the amount of line as the depth you are fishing before attaching the board, and to rig the sucker with little or no weight. Use the tightest releases available so they don’t trip off or you’ll be always chasing them around. When you get bit, quickly chase down the board and manually take it off – very few fish drop the bait at this point. There is practically no resistance from the board to the fish, certainly less than with a big float. For this presentation to work properly you have to go into the wind with the wind parallel to the structure, quartering from you to the structure (or out if you are using the board on the outside), or calm.
DRAWING FISH TO YOUR BAITS
Another important aspect of this system is the ability or the attempt to draw fish to the baits. In a past article I talked about the use of shocker baits for locating fish under tough conditions, and they become important to this presentation because any time you can locate a hot fish and/or get it within sight of your livebaits you have an excellent chance of catching it. A bait directly below the boat or trailing behind will pick up follows that hang below the boat or stay on the break after giving up on the artificial. A planer board can intercept fish that are heading back to the structure.
If water temperatures are still on the warmer side, if I’m trying to conserve prime livebaits (because they’re hard to get), or if the fish are responding so well to artificials we don’t want to be slowed up by the livebaits, a bait ‘n’ switch technique works well. Keep a fresh, unused livebait prerigged and waiting in an aerated livewell so that when a fish chases to the boat the sucker is taken out of the livewell and thrown out the backside. Allow the boat to drift over the fish or use the trolling motor to drag the sucker through the area.
At the same time I throw a marker buoy to precisely mark the area. The buoyed area is then thoroughly worked over with several baits – both deeper and shallower – until the fish either eats or you are reasonably certain she has seen your baits and will not respond.
Figure it out – you have the chance of catching a fish on the cast or on the figure-8. An inside planer would catch a shallow-holding fish or intercept a returning fish, an outside planer could catch a fish on the deeper break or suspended, a down line, back line, or thrown bait could catch a fish not responding to a figure-8 or take a fish holding at that depth, and you can buoy and work a fish that doesn’t hit the artificial. Lots of options and opportunities – how many or which ones you incorporate depends on laws in your area, number of people in the boat, what the fish are doing, and the conditions. Most certainly your presentation is not one-dimensional by any means.
SETTING UP THE HOOKSET
The hookset is probably the point where most fish are missed or lost – it is critical to set the fish up before setting the hook. First off, before even putting a bait in the water, determine who is going to take the first hit or the order of the day. The last thing you want is tow or three guys going back or forth “You take it”, “No you take it”, “No really, be my guest,” while a big fish is moving farther and farther away. It’s amazing how chaotic things can get when a clicker begins to scream. Try to stay as calm as possible – intelligent judgments are more easily made.
Quickly get all other lines in. If the fish grabbed a long free line, float line, or took off taking lots of line you must quickly go to the fish, cutting the distance to 20 to 40 feet. If the musky grabbed a planer board line you must first go to or catch up to the board, take it off, then set the fish up.
To set the fish up, raise your rod tip up to get some line out of the water so you can be sure of the fish’s location and what direction it is heading. You want the fish to be going away at no more than 45 degrees to drive the hooks back into the corner of its mouth. If it’s closer to 90 degrees or, worse yet, facing you, the hookup percentages will be very low. If the angle is not right, quickly move the boat to the proper position or sometimes (especially with a docile or lazy fish) you can actually steer them into position with steady-but-not-too-strong rod pressure. If the fish is facing at the right angle but not moving, give her a little prod or love tap and usually it will take off for you.
Having the fish moving away at hookset greatly increases hookups. You’ve got the fish at 45 degrees or less, moving away and within 40 feet or so. Up to this point your reel has been in free spool except when taking up line to close distance. Point the rod directly at the fish and engage the reel. Reel like a madman until you feel the full weight of the fish and at that point pull back as hard as you can with a full, sharp hookset with your thumb on the spool to eliminate any drag slip. Immediately reel down on a tight line and set hard again two more times – the first hookset breaks the rubberband, the second frees the hooks if they did not break loose on the first hookset, and the third hookset is for insurance and keeps ’em honest. All this should be accomplished in less than 30 seconds – even going to a planer board and the setup can be done in less than a minute. Just act calmly, quickly, and decisively to eliminate any chance of a fish swallowing the rig.
As you can see, livebaiting is an artform evolving into a highly-refined and sophisticated presentation, and this is just the tip of the iceberg. It does not replace artificials, but is an added dimension well worth your time to learn and perfect.
Steve Herbeck is considered to be one of musky fishing’s most innovative anglers. He owns and operates Andy Myer’s Lodge on Eagle Lake in Ontario. You can contact him through his web site at http://www.andymyerslodge.com. |