|
Choosing the right fishing rig to use under various conditions is important as learning how catch fish on them. Most rigs are designed fairly simply and are used for specific types of fishing. We have assembled information on the basic rigs, how to tie them and a few pointers on how to fish them. The basic fishing rigs are numbered 1-9 please scroll down to the rig you wish more info on: 1.Texas Rig, 2.Carolina Rig, 3.Drop Shot Rig, 4. Sliding Sinker Bottom Rig, 5.Split Shot Rig, 6.Three Way Rig, 7.Stream Rig, 8.Bottom Bouncers, Bait Walkers, and 9.Slip Bobbers. 1. Texas Rig
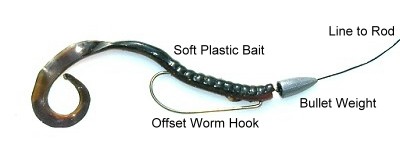
No bass fishing arsenal is complete without knowledge and how to fish the Texas rig. Considered a finesse technique not a search bait such as inline spinner crank bait or spinner bait. The Texas rig is adaptable to all kinds of soft plastics from worms to lizards and grubs that can be fished in extremely dense vegetation and brush. The presentation is placement as close to cover (weeds, logs) as possible. When casting or flipping try to let the rig enter the water with as little noise as possible and keep some controlled slack in the line, watch your line as well as many fish will strike the rig on the fall. If you don’t get a bite, let the rig rest on the bottom and then begin to retrieve in a very slow, jerk pause motion. Always keep little tension on the line because learning this technique is a lot about learning to differentiate between the feel of the bottom and the feel of a fish. In setting the hook use a forceful snap of the rod ensuring the embeded hook point travels through the body of the soft plastic bait. Suggested Tackle What you need for a Texas Rig Assortment of Bullet Sinkers (Lead Brass or Steel) Offset Worm Hooks Soft Plastic Lures How to Rig Thread the Bullet Sinker on the line making sure the nose of the sinker faces the rod tip. Tie on the hook using a Palmor or a Improved Clinch Knot Optional: Plastic or Glass Bead between the weight and hook. To make the weight stationary peg the bullet with a piece of toothpick, or use a screw in bullet weight. Insert the hook about 3/8″ through the nose of the soft plastic bait, pushing hook completely through. Embed the offset portion on the upper shank of the hook into the nose of the soft plastic, this locks the soft plastic lure on the hook Insert the point of the hook back into the soft plastic making sure the bait hangs straight. Insert the point of the hook into the body of the bait. This makes it weedless. It is a good idea to push the hook through a couple of times to make a small hole or channel in the plastic. This will help insure a good hook set. 2. Carolina Rig
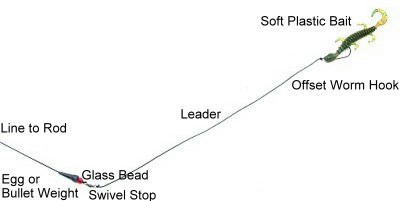
The Carolina rig is a popular and effective way to rig for bass. Just about any soft plastic can be used when Carolina rigging. It is a successful method of soft plastic bait presentation in all depths of water, its only limitation is certain types of cover that you are trying to move it through. For example areas of extreme weeds or brush don’t lend themselves to the usage of a Carolina rig. Areas were the bottom is made up of rocks and boulders that are very close together is another area where the rig is sure to get caught up. Fishing with a Carolina rig you can see why they are so effective as the rig is drawn across the bottom the soft plastic bait will move side to side upward and downward bumping weeds and bouncing off rocks. Cast and retrieve slow is the key for a successful presentation. A bite on a Carolina rig can be a subtle tap, twitch or pressure on the line in setting the hook use a forceful snap of the rod ensuring the embeded hook point travels through the body of the soft plastic bait. The Carolina rig is basically a modified Texas rig with a few additions and similar to a sliding sinker bottom rig used for walleyes. Suggested Tackle What you need for a Carolina Rig Assortment of Sinkers Types Bullet or Egg (Lead, Brass or Steel) Swivels Offset Worm Hooks Lures How to Rig Determine the leader length, 18″ to 36″ is the most common, the general rule is 18 inches of leader per 10 feet of water. Tie your hook on to the leader on the other end tie on your swivel using a Palomar or Improved Clinch Knotfor both. Slip on the sinker on your main line, if your using a bullet weight be sure the point is facing the rod tip. Then slip on a glass bead, this adds sound that attracts bass and acts as a insulator protecting the knot from the banging of the weight. Tie on the leader to the other side of the swivel using a Palomar or Improved Clinch Knot . In rigging your soft plastic’s on the hook use the same procedure as the Texas Rig above. 3. Drop Shot Rig
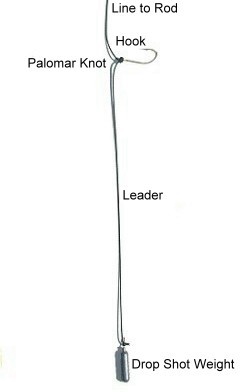
The drop-shot rig is a finesse technique that has been made popular by the bass fishing community, walleye and panfish anglers as well are now using the drop shot with many successes. It is especially good for suspended fish that requires vertical placement of the bait in front of active fish. The drop shot is a way of tying your hook up the line and putting the lead on the bottom. Fishing the drop shot is simple, cast or drop the rig straight down over the side of the boat, when the line goes slack reel up until the line is tight with the weight on the bottom, now shake the rod gently, you just want your bait to wiggle. A bite can be a subtle tug, a side way movement or just pressure on the line. Set the hook using a upward sweeping motion. Suggested Tackle : As a finesse rig the drop shot is best fished on light line and spinning outfits. What you need for a Drop Shot Rig Weight/Sinkers Hooks Lures/Live bait How to Rig The drop shot rig is a easy rig to tie as long as you become comfortable with the knot used for the hook. The Palomar Knot . We recommend first time users to practice tying this rig at home before heading out on the water. As a reference you should print out a copy of our knot instructions as a guide. Just Click Here . To tie a drop shot rig determine how far off the bottom you want your bait to be 18 to 36 inches, make a loop at that length and pass the line through the hook eye from the point side. Allow the hook to dangle, and tie a loose over hand knot in the doubled line, being careful not to twist the lines or tighten the knot. Pull the line by its looped end far enough to pass it over the hook Pulling at both ends of the line, tighten the knot. Leaving one end connected to the rod and the other tag end to tie on the drop shot weight using a Improved Clinch Knot . Be sure the hook rides horizontally from the line. 4. Sliding Sinker Bottom Rig
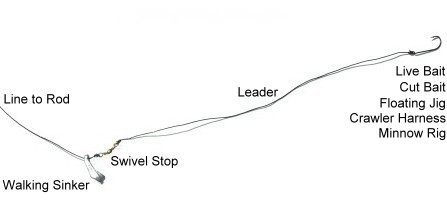
The sliding sinker bottom rig is the most popular and versatile rig for live bait fishing. Dependent on what part of the country your from and the species of fish you’re targeting it has many names the most common is the Lindy Rig a trade name, others include: Live Bait Rig, Slip Rig, River Rig, Catfish Rig, Walleye Rig, Walking Sinker Rig and Sturgeon Rig. The basic rig is simple; weight/sinker – swivel/stop – leader – hook – floating jig- or crawler/minnow rigs all used for live bait. The fishing presentation allows the sinker to rest on the water bottom with the bait suspended above. This feature prevents the a fish from feeling the weight as the line passes through the sinker. Suggested Tackle Fishing from a Boat River Fishing Controlled Drifting or Trolling What you need for a sliding sinker bottom rig With the hundreds of options that this rig offers it is impossible to list all by types for each species and fishing conditions that you may encounter. But here are some general guidelines to follow: Weight/Sinkers Recommended Sliding Sinker Weights The weight of the sinkers used on rivers is a totally dependent of the current speed and type of live bait. Egg, no roll, disc, casting, and pyramid sinkers are all used for river rigging ranging in weights from a 1/8 to 8 ounces. You’re best bet is to check with the local sport shop or a local fishing guide in finding the correct type and weight for the proper set-up. Hooks Other hooking options include floating jigs sized by the hook #4-#6. Crawler and minnow pre-rigged harnesses with single or double blades work extremely well in stained or murky water by producing a loud blade vibrations helping the fish locate your bait. Swivels Live Bait How to Rig Begin with making the leader, we recommend using fluorocarbon monofilament as the leader material, it is invisible in the water and abrasion resistant and has low stretch. This can be purchased at quality sport shops as 10 to 20 yard spools. Start with cutting the length of leaders at 24-to-36 inches use 6 to 8 lb test for walleye and bass – 8lb to 10lb for light catfish & pike – 20lb for medium catfish -Large catfish & sturgeon 30 to 40lb test. Note: Length of leader and size of hook will vary based on the fishing conditions. Tie the hook on one end using a Improved Clinch Knot tie the other end to the swivel using the same knot Thread the sinker onto your fishing line. For the walking sinker make sure the bent bottom end is facing towards the rig or away from the rod tip. Bullet sinkers face the tapered end towards the rod tip. Egg, no roll, disc, casting, and pyramid sinkers have no preference. After slipping the sinker on your line tie to the open end of the swivel on the leader using the Improved Clinch Knot. Once tied, the slip sinker should be above the swivel and move freely. 5.Split Shot Rig
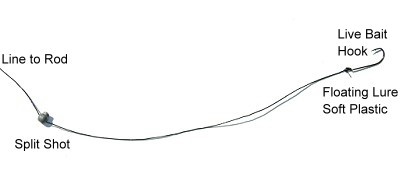
This is about as basic as you can get on a rig. The nice thing is, you don’t have to retie any knots to change the sinker position on the line; just pinch it on and off. Fishing with the split shot rig is considered a finesse technique by adding a split shot sinker in front of your live bait offering, using line 4-8lb test on a light to medium light spinning rod and reel set-up. Unlike the other rigs mentioned Texas, Carolina and the sliding sinker rig that are primarily fished on the bottom, the split shot rig gently moves downward after a cast, until it reaches the bottom thus requiring patience to fish it correctly. There is no wrong way to fish this rig, it is excellent for open water covering vertical structure, steep breaklines sloping banks and bluffs where fish suspend, it is also surprisingly good in light timber using a weedless hook and a light split shot where the weight isn’t heavy enough to pull it down into the branches. The split-shot rig is also effective around floating boat docks, where fish often hang under. The placement of the split shot is more versatile and adjustable than most anglers think. The general consensus is position the split shot 18 inches above the hook, which gives the bait adequate freedom of movement. But by placing it closer to the bait like within a 12″ or less the bait will react more like a jig, giving a pronounced action. Conversely by placing the split shot 3 feet or more up the line will minimize the action of the live bait. As a finesse technique this will require the angler to keep alert while using this rig, watch the line after the cast for any subtle changes or sideway movement a twitch means you have a bite, upon engaging the reel beginning the retrieve keep the bait moving on a semi-tight line leaving a little slack. Avoid keeping the line too tight this will take away the natural presentation of the bait. If the slack in the line tightens or you feel a slight tick you have a bite, make a easy sweep upward to set the hook and keep the pressure on the fish. Tackle Suggestions What you need for a split shot rig Weight/Sinkers Hooks Tip How to Rig Tie a hook on the line using a Improved Clinch Knot. Add split shot 6. Three Way Rig
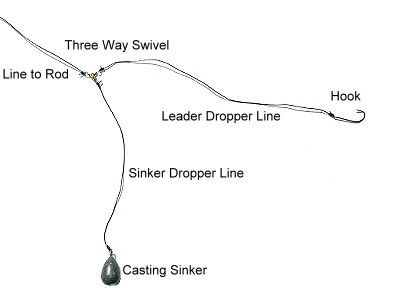
The three way rig receives its name from the main swivel used on the rig. It is also recognized as the wolf river rig. Unlike the sliding sinker bottom rig three-ways don’t slip, so you don’t feed line upon a bite, they are a fixed bottom rig mainly used on river systems to place the bait at a set distance off the bottom. The three way is used from a stationary position, anchored in a boat or from a shoreline. The bite indicator is your rod tip the key to sense a strike is to have no excess line between the three-way and the rod. River currents creates drag on the line which reduces sensitivity and control. In other words you do not want to have a bow in your line from the rod to the rig. Tighten up the line as much as possible to have a direct line from the rod to the rig. When you see a bite the tip of the rod will twitch, simply drop the rod tip towards the rig allowing it to collapse the rig back to the fish, as the slack of the line tightens, its time to set the hook using the upward sweeping motion of the rod. Suggested Tackle: Rod/Reel/Line Set-ups: White Bass/Stripers & Walleye 6’-6″ to 7’0″ Medium/Fast Action Spinning Rod and Reel with 10lb monofilament test line. Catfish 6’-6″ to 7’-0″ Medium/Fast Action Baitcasting with 20lb to 30lb monofilament test line. Trolling Options What you need for a three way rig Weight/Sinkers Hooks Swivel How to Rig Tie the main line to one eye of the three way swivel, add/tie the drop lines. one at 12 to 18 inches and the other at 24 to 36 inches to the other two eyes on the swivel. Tie the hook to the longer drop line (24/36″) and the sinker to the other at (12/18″) For all knots use the Improved Clinch Knot. Tip: If you fish in area’s with a lot of snags, reduce the drop line pound test for the sinker than the main line or hook line, this way if the sinker gets hung up, the lighter dropper line with the sinker breaks with out loosing the entire rig. 7. Stream Rig
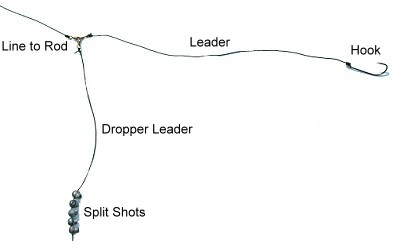
The stream rig also known as a drift rig are used commonly by steelhead, salmon and walleye anglers in certain situations, such as in small streams with light current or when drift fishing in relatively shallow water. The stream rig is very similar to the three way rig with the exception of the sinker dropper line which uses a series of split shots instead of a casting (bell) sinker. This allow the angler not to lose the entire rig if hung up, by applying pressure pulls the split shot off the dropper saving the hook and swivel. Fishing the stream rig takes some finesse and can be difficult for the new angler to pick-up. The basic presentation of the rig is relatively simple, but requires a very light touch and feel to detect what is the bottom and what is a fish. The rig is cast upstream in the current and allowed to sink to the bottom. The key here is to have enough weight attached to let the rig to bounce along the current, slowly towards the angler as it moves downstream. Some fish are caught in this portion of the drift where the rig is bouncing, but most bites occur at the bottom end of the drift when it is quartering (The swing) back through the current towards the angler. At this point the rig is moving slower than the dead drift portion of the drift and more fish are apt to see and strike the bait quartering than coming straight at them. As the split shots on the rig and bait ticks along the bottom, this is where the angler must pay close attention to differentiate between the feel of the bottom and the feel of a fish. Any bump, twitch or pulling sensation can be a fish. If you’re unsure … set the hook. After a while, you’ll develop a ‘sense’ of what is bottom and what is a fish. Suggested Tackle: The basic rod and reel set-up for fishing the stream rig is light for the sensitivity, many anglers prefer longer light, soft action spinning rods with 4-8lb test line for drift fishing. 8’ to 10 foot drift rods are common. The long soft action rods will bend starting in the lower third using nearly the entire rod providing the most flexibility. Because of this parabolic action the angler is using the rod as a shock absorber in fighting the fish in the current this allows the use of light line. What you need for a stream rig Weight/Sinkers Hooks Three way swivel How to Rig Tie the main line to one eye of the three way swivel. Add/tie the drop lines, one at 6 to 10 inches and the other at 24 to 30 inches to the other two eyes on the swivel. Tie the hook to the longer drop line (24/30″) and the split shots to the other at (6/10″) For all knots use the Improved Clinch Knot. Add the appropriate amount of split shots to the sinker dropper line. 8. Bottom Bouncers and Bait Walkers
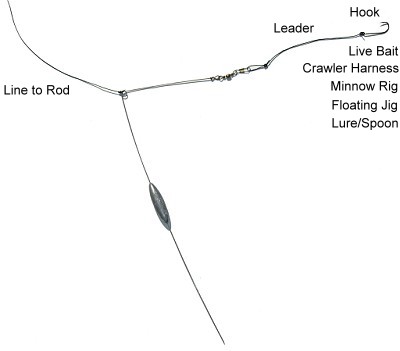
Bottom bouncers are weighted L-shaped piece of heavy wire using live bait, crawler harness or floating spinner rigs attached to the non weighted arm via a snap swivel. The bottom bouncer can be as light a1/2 oz up 3 ounces. This is all attached to your rod, by tying the line to the eye at the intersection of the two wire arms of the bouncer. The bottom bouncer is an effective rigging tool while trolling or drifting presenting the lure/bait rig above snag laced bottom of small rocks, logs, over mud/sand flats, or open basins. A weighted wire feeler arm minimizes hang-ups while riding upright across underwater structure deflecting snags. Using a bottom bouncer is a search technique by covering a lot of water efficiently (trolling or drifting) in seeking active feeding fish especially walleyes that tend to related to bottom structure. Fishing a bottom bouncer, the angler casts or releases the line allowing the rig to sink to the bottom, engage the reel to tighten line as close to a 45 degree angle from the boat, this guarantees frequent bottom contact, control and feel. You do not want the line to be vertical, by having the 45 angle provides enough distance for the bouncer to work correctly and gives it enough distance from the boat not to spook the fish. When you feel a bite ( a subtle tap, twitch or pressure on the line) lean the rod tip forward slightly and use the rod in a sweeping overhead motion away from the fish in setting the hook this helps eliminating any slack line ensuring a good hookset. Bait Walker
The Bait Walker is a trade name for a similar rig only smaller in overall size. The weight is located on the bottom tip of the lower arm than in the middle on a bottom bouncer. The weight design is tapered, rounded and has a concave flat top which makes the bait walker feel like a keel sinker providing little resistance as it rides across the bottom, excellent for trolling in preventing line twist. Another feature is the selection of weight options 1/4 oz up to 10 ounces allowing the angler the versatility to use the lightest presentation, small floating crank baits and flutter spoons for walleye and bass down to reaching the depths for lake trout. Suggested Tackle: What you need for a bottom bouncer Weight Sizes Recommended Bottom Bouncer Weights: Hooks/Rigs/Lures Colors/Blades Typically the blade sizes and types on pre rigged worm harnesses and minnow rigs are Indiana and Colorado blades sizes #3-#4-#5. The Indiana spins tighter to the rig than the Colorado producing less of a thump, conversely a broad blade such as the Colorado will rotate at a greater outward angle from the rig producing a lift, greater thump and more vibration. As you can see, fishing a bottom bouncer presents numerous bait rigging questions: How to Rig Tie the bottom bouncer on the center eye at the intersection of the two wire arms of the bouncer using a Improved Clinch Knot. Attach the appropriate rig to the top arm snap swivel. 9. Slip Bobber Rig
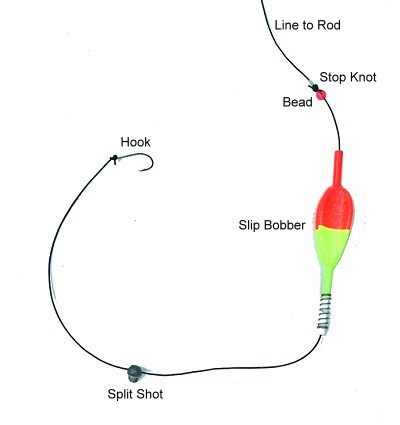
Many anglers began their first fishing experience using a red and white bobber rig off a dock or boat for panfish. While the basic bobber set-up is simple we have witnessed over the years many anglers over-rig this set-up by using a extremely large hook, connected to a pike leader attached to a tennis ball sized bobber. Unfortunately they never received guidance or advice for the correct presentation, but at least they are fishing. To properly fish a attached bobber or slip bobber rig the key is to use the smallest and lightest tackle in order to present the live bait as natural as possible, and to detect a bite from your bobber. By doing this your success and catch rate will increase dramatically. For a bobber or float to work properly, there has to be some point to hold the bobber from movement on the line to float. Conventional round bobbers achieve this by attaching directly to a fixed point on the line using a snap, cigar shaped floats use a spring that is pulled back with the line inserted into a slot, by releasing the spring, will hold the line. The attached to line bobbers will work but are limited to very shallow water a few feet or so, in other words the amount of line from the attached bobber to your hook should be shorter than you’re rod length. Using a bobber to hook length longer than the rod will restrict your casting ability and the fish landing as the attached bobber stops the line at the rod tip hampering your efforts to net the fish, especially large ones. The slip bobber can be fished at any depth, it’s design has a hollow tube through it and will slide freely from the hook or bottom weight to the stop. The stop point on the line is called a bobber stop, this can be purchased at a store as rubber pellets, small vinyl strips and dacron knots on a tube, or can be tied by the angler using this knot ( Stop Knot ) The bobber stop when used correctly is small enough to pass through the rod guides and reel mechanisms when retrieved or cast, but is large enough to stop the bead on a slip bobber. Thus the angler using slip bobbers can fish at any depth, only limited by the depth of the water and the amount of line on the reel. Fishing a slip bobber is an effective way to catch almost any species of fish. To began, the slip bobber rig should be balanced with the correct amount of weight including the live bait. The bobber/float should only be large enough to hold your bait and float upright in the water, that way it will be sensitive to any type of bite. If your bobber lays flat on the surface, you’re probably on the bottom or need additional weight. Adjust the bobber stop upward or add weight. Setting the correct depth is critical for successful slip bobbering. Start at 6″ to 12″ inches off the bottom and adjust the bobber stop upward from there. Walleyes and perch relate to bottom structure, bluegills, crappies and bass often suspend higher. An inexpensive tool to use in setting the correct depth off the bottom is a ice fishing depth finder, a alligator clip attached to a lead weight. These can purchased at any fishing shop for under two dollars. Clip the depth finder on the hook release the line until reaches the bottom, set/slide the bobber stop accordingly. Upon setting the proper depth and weight balance on the slip bobber. It’s time to fish. Once reeled up the slip bobber should rest above the split shot with the bobber stop on your reel. After the cast wait for the bait to sink and the bobber to go upright before reeling in any slack line. Keep alert for any movements, up, down, sideways, indicating a bite, if the bobber goes flat on the water, this means a fish has taken your bait and is swimming upward eliminating the weight that kept the bobber upright. In setting the hook reel in any slack line, use the rod in a sweeping overhead motion away from the fish this helps ensuring a good hookset. Suggested Tackle: What you need for a slip bobber rig/bobber Type of Floats/Bobbers Round Basic Bobber Pear Shaped Slip Float Cigar Shaped Slip Floats Pencil Slip Float Oval Slip Floats Bobber Stops/Stop Knots The Dacron stop is the most universally used as well as the easiest to adjust on monofilament just wet the line and slide the stop to the proper setting. Weight/Sinkers All fishing shops and discount stores sells split shots, purchase the assortment pack that comes in a round case for a selection of sizes and weight. Split shots come in standard round once pinched on your line they can be difficult to pry open to remove or reusable which features tiny wings that you can pinch between the thumb and forefinger to remove or move on the line which we recommend to start out with. Hooks Live bait How to rig a slip bobber Began by threading the stop knot tube on the line Push the stop knot off the tube onto the line toward the rod tip and remove tube. Pull the loose tag ends of the knot semi-tight to be adjustable. Trim off the tag ends close to the knot. Thread on the bead and slip float, be sure the top of the float is facing the rod tip. Pinch on a split shot below the float and tie on the hook on using a Improved Clinch Knot. Tip |