It’s happened to all of us. You are fishing alone when the 4-foot beauty strikes and, obviously, you want a picture. Sound impossible? Not so with the proper equipment and a little preparation.When I’m not fishing with a client, I spend many hours out fishing by myself. The very first season I did this, I photographed my fish by laying them on the floor next to the measuring stick. This inevitable resulted in slime removal and also in some really boring photographs.That winter I remedied the situation by purchasing a waterproof camera with a wireless remote control option. There are several film and digital cameras out on the market that fit the bill. I am currently using a digital camera, an Olympus Stylus. This camera is considered “weatherproof” not waterproof. That means you can’t take underwater photos with it. I have had it out in pouring rain and nasty sleet and snowstorms, though, and it performs flawlessly. This model is very easy to use—just point and shoot—and is tailor made for special fishing situations.
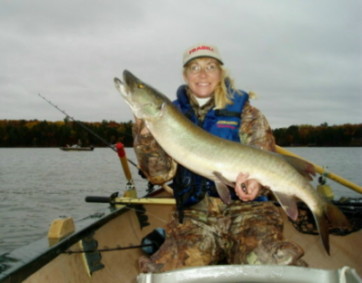 |
| Here I am photographing a nice Eagle River area musky that I caught and released while out row trolling by myself one day. Notice the remote control in my hand. |
Here’s my routine:
- I attach the camera to a mount and secure it in place. (The mounting system consists of the base of a camera tripod stand attached directly to the bow of my boat.)
- Catch a lunker.
- Quickly turn on the camera and set it in the self timer/remote control mode.
- I sit in a pre-determined area and hold the fish.
- I take the remote out from my pocket, push the button, and grin from ear to ear.
- Three seconds later the shutter is released and shortly afterwards, so is the fish!
A great photo while fishing alone is that simple.
I like the wireless remote control feature as it allows me to get situated before taking the shot. However, the manual states that the remote option may not work in a backlit situation. This has only happened to me once and it was remedied by simply using the self-timer mode and hurrying to sit down and smile. One caveat: remember to stand behind the camera while setting it in self-timer mode. If you stand directly in front of the camera it will focus on where you are standing on not where you will eventually be sitting while holding the fish.
This set-up is extremely advantageous for those of us who fish alone, but it also has other applications. Whenever I’m fishing with a client or a friend, we are able to take a great picture of the two of us together with the fish. Since musky fishing is generally considered a group effort (your net man is so important), this is a wonderful reminder of the day.
If you are fishing with a child or someone not able to properly hold the fish, this system ensures the safety of the fish and the fisherman. There is nothing worse than a wife catching her first musky, and, since she is hesitant to hold that toothy creature, her husband holds it for the photo. This way, both anglers can make history!
Be sure to take some practice shots prior to fishing. You will want to discover the perfect place to sit or stand to properly frame in both you and the entire fish. This can be a challenging task if you have a small or narrow boat, as is the case with my row troller.
I’ve also mounted the camera on the top of my boat’s bow light to give it some extra height. You’ll have to play around here to decide what works best for your boat’s layout.
Hold your measuring stick, sit in a few different places and snap away. Pose solo and with a buddy.
Then, you are ready to hit the lake all by yourself. Remember, you will have to net that monster by yourself, too-but that’s another story! |